One way lighting circuit using in-line switching
Line
diagram of a one way lighting circuit using in line method (fig 1).
 |
| Fig 1 |
A one way light switch is quite easy
to wire up.
 |
| fig 2 |
The cable going to the light switch
is connected as follows (fig 2).
The red wire from the feed cable is connected to the top terminal, the red wire
going to the light is connected to the bottom terminal, the black wires from
both cables are connected together in a plastic terminal block and the earth
wires are connected to the earth terminal. If you are using a plastic switch
the earth wires will need to be connected to the terminal in the terminal box
(as shown above) because there are no earth terminals on plastic switches.
A two way light switch can also be
used in in place of a one way light switch, in this instance the red wire from
the feed cable is connected to the common (C) terminal and the red wire going
to the light is connected to the (L1) terminal. The (L2) terminal is unused.
A metal light switch must be earthed
as seen below.
 |
| fig 3 |

If you are using metal light switches (fig 3) make sure you
connect the earth wire to the earth terminal on the switch and fit an earth
link wire from the switch to the earth terminal in the back box.
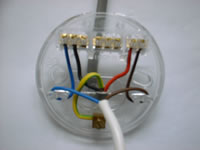
When using a ceiling rose on a
circuit that utilises the in line switching method, again the wiring is quite
easy, the difficult part is working at height and above your head.
 |
| fig 4 |
The cable going to the ceiling rose
is connected as follows (fig 4).
The red wire is connected to the same terminal block that contains the brown
wire going to the lampholder, the black wire is connected to the same terminal
block that contains the blue wire going to the lampholder and the earth wire is
connected to the earth terminal.
sources:http://www.diyhowto.co.uk/projects/one-way-light-switch
No comments:
Post a Comment